
Thom Yorke recently released his third solo album, Anima. The album continues the musical progression started in 2006’s The Eraser and 2014’s Tomorrow’s Modern Boxes and was worked on alongside Nigel Godrich, Radiohead’s longtime producer. Anima’s release was preceded by mysterious worldwide adverts for a ‘dream camera’ and some of the album’s themes involve dreams.
While this article focuses on the sound of Thom Yorke’s album Anima, I have previously covered Radiohead synth sounds in my Recreating Radiohead’s Keys and Synths with Software Instruments guest article for Reverb.com as well as Radiohead’s songwriting techniques in my Radiohead Chord Theory article.
Thom Yorke Synths
Thom is a big fan of the Prophet synths, having used an SCI Prophet-5 with Radiohead on Kid A and a DSI Prophet 08 in later live performances. Since 2015, Thom has been using a Prophet-6 live, and it’s likely this synth that many of Anima’s sounds came from.
The Prophet-6 seems to be important enough to the sound of Anima that Godrich uses a second unit offstage for live shows. The Prophet-6 is a faithful-yet-modern tribute to the vintage Prophet-5 synth, with all the character of the original synth, but with modern perks. For this article, I’ll use the fantastic softsynth u-he Repro-5, another tribute to the Prophet-5, to recreate some of Thom Yorke’s Prophet sounds from Anima.

Twist
I’ll start with the warm, swelling pad in the song Twist. The elements to this sound are a shallow vibrato and a long attack applied to both the filter and the amplifier. I’ll create the patch in Repro-5, but most analog-style polyphonic synthesizers will also work. Start with detuned sawtooth waves and lower the filter cutoff almost all the way closed. Set both envelope times with a long attack time (75 in Repro), medium decay (50), full sustain, and an extended release time (60). Apply the envelope to the filter by raising the envelope amount knob to halfway, which with the long attack time will create a swelling effect.
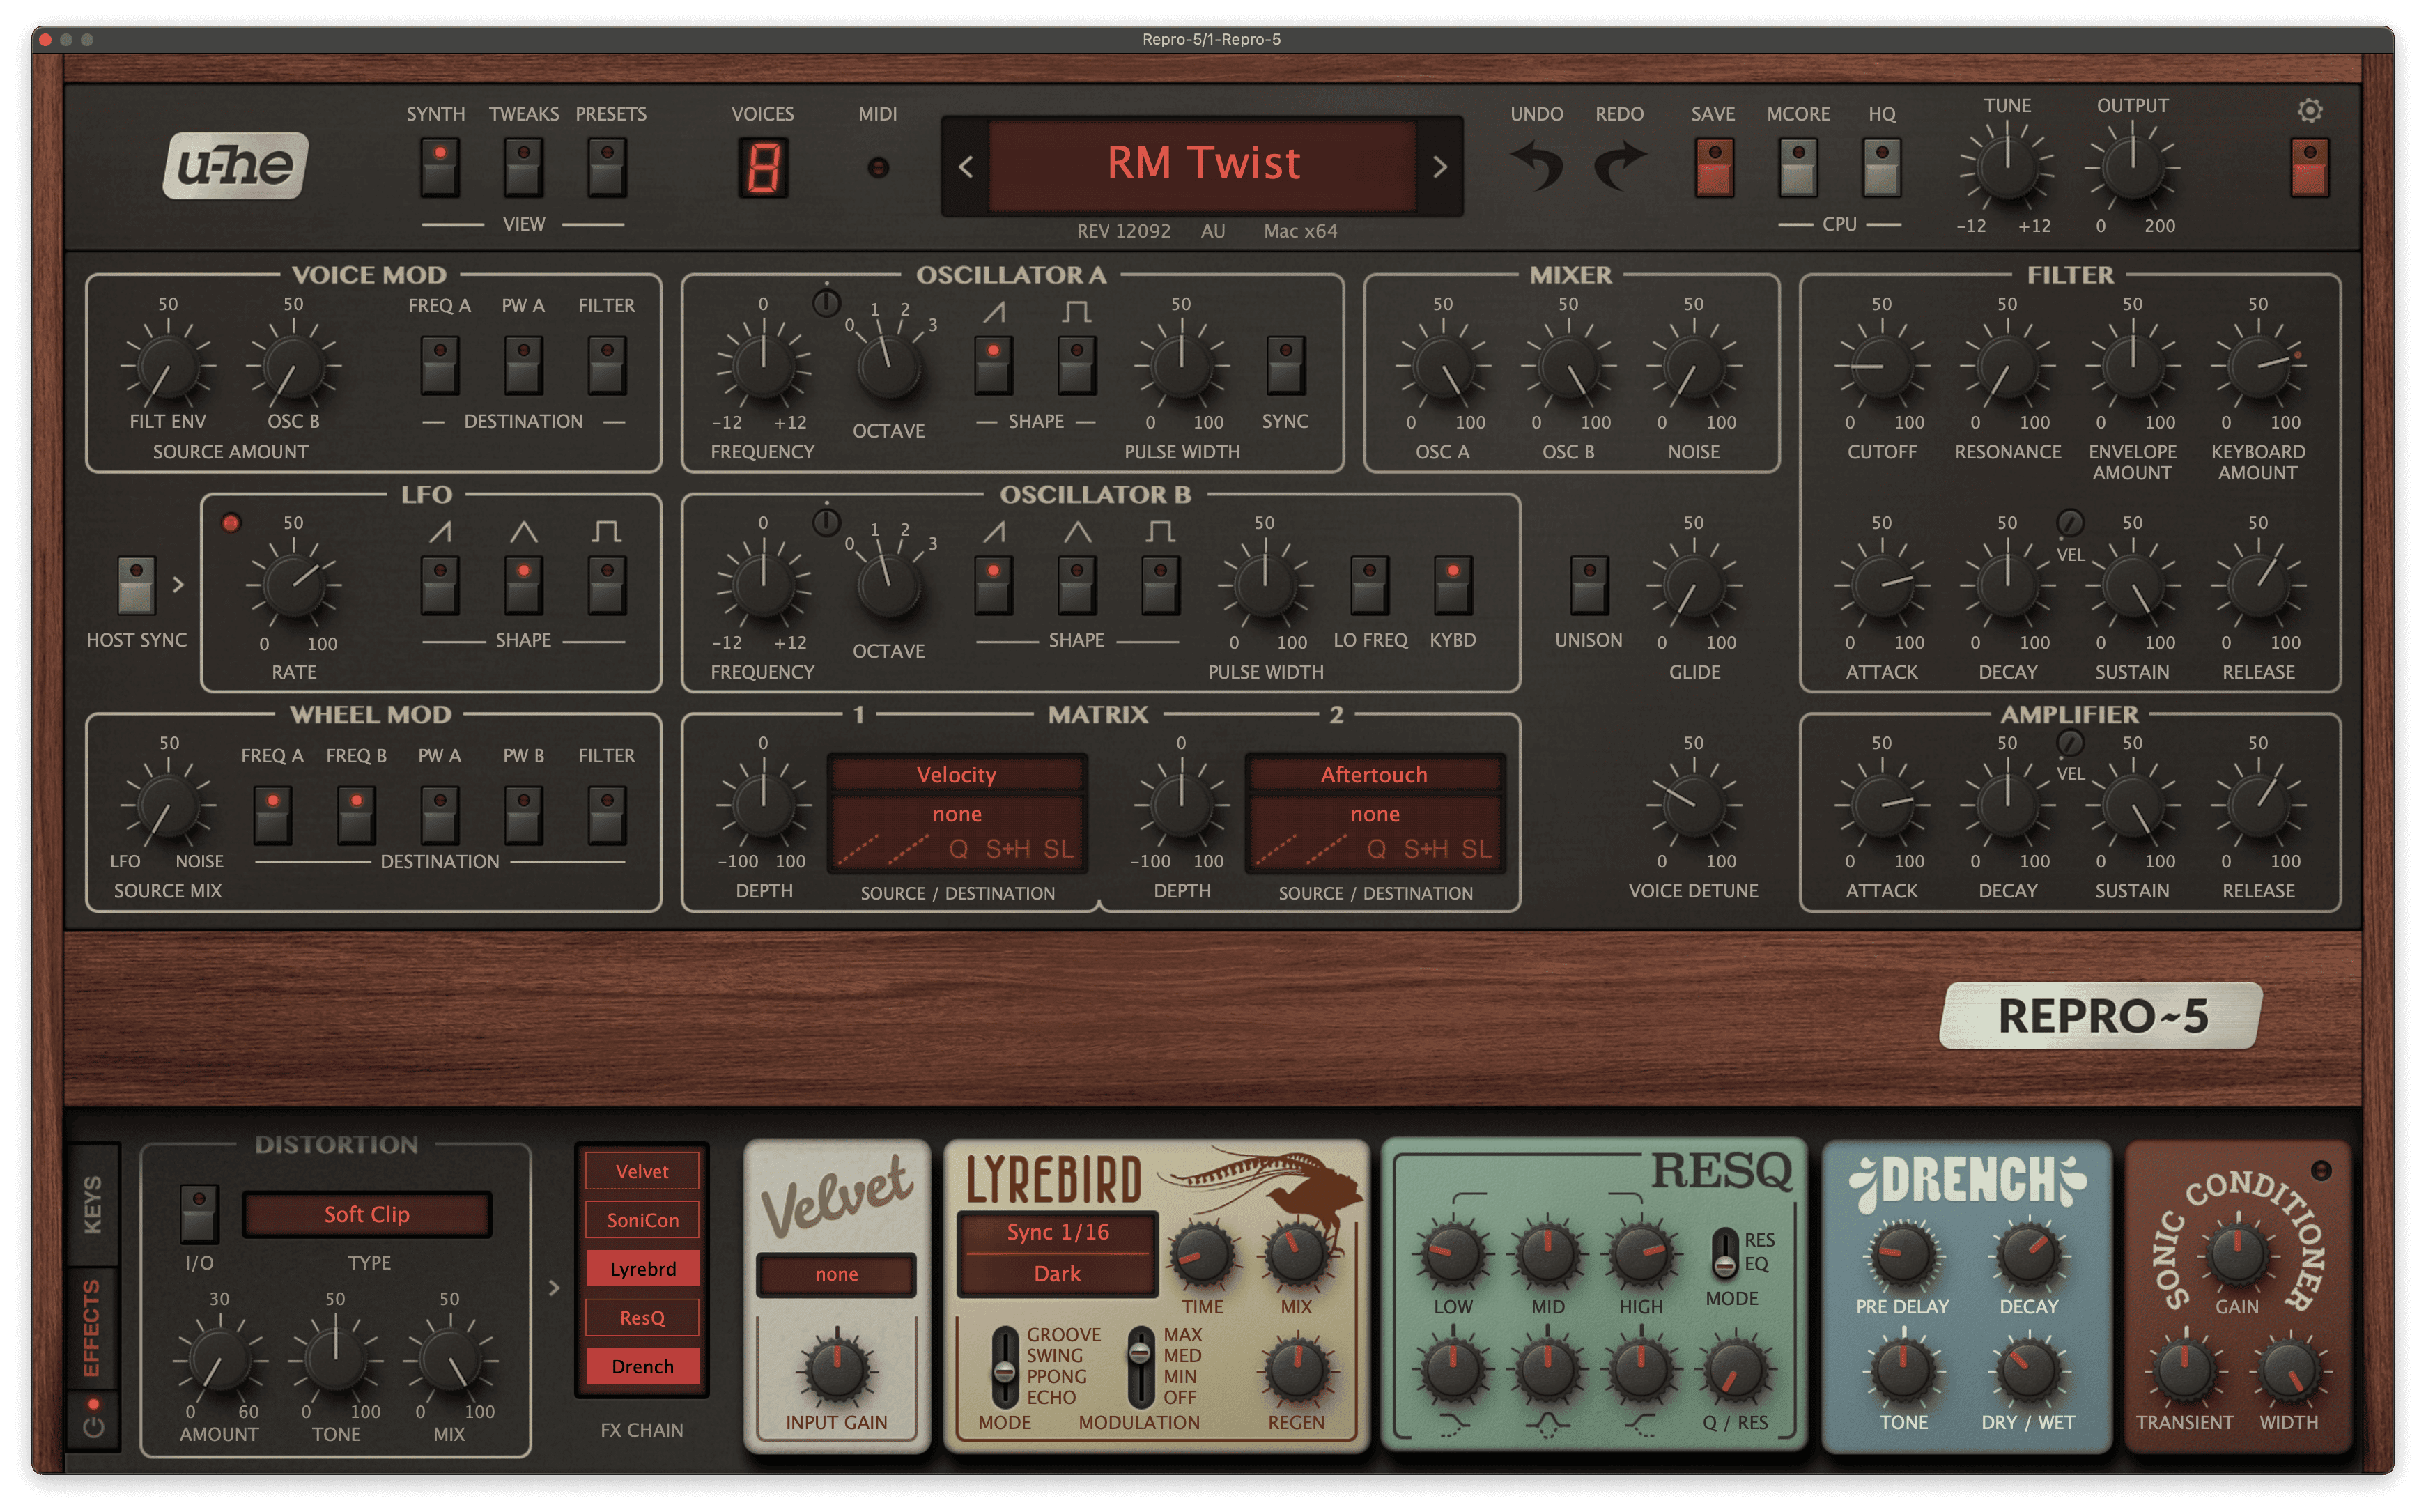
For the vibrato, we want a medium-fast LFO speed with a low amount of pitch modulation. In Repro, vibrato is applied by activating the Freq A and Freq B buttons in the Mod Wheel section and then raising the mod wheel slightly. Set the LFO rate to 67 for the same vibrato speed as Twist. To have more control over the modulation amount, you can set the lower and higher modulation limits by adjusting the red and white triangles next to the mod wheel. I also applied delay and vibrato to the patch using Repro’s onboard effects.
Check the video out below to hear the Repro patch in action. The layered piano in the video came from NI’s Alicia’s Keys library processed with ValhallaRoom.

Dawn Chorus
Dawn Chorus is a dreamy ballad composed of simple, warm Prophet keys and Thom Yorke’s spoken word over the top. Although the synth patch sounds reasonably simple, if you listen closely on headphones, you’ll notice the voices are panned differently around the stereo spectrum; the highest voice being panned hard-left and the middle voice slightly to the right.
The bass voice also appears to have been processed differently, being slightly more driven than the higher voices. To achieve this, the synth performance would have been first recorded via MIDI. This MIDI track would have then been split into separate voices and each voice sent to the Prophet-6 to be rerecorded separately. The different recordings can then be mixed, processed, and panned separately to create a much deeper sound.
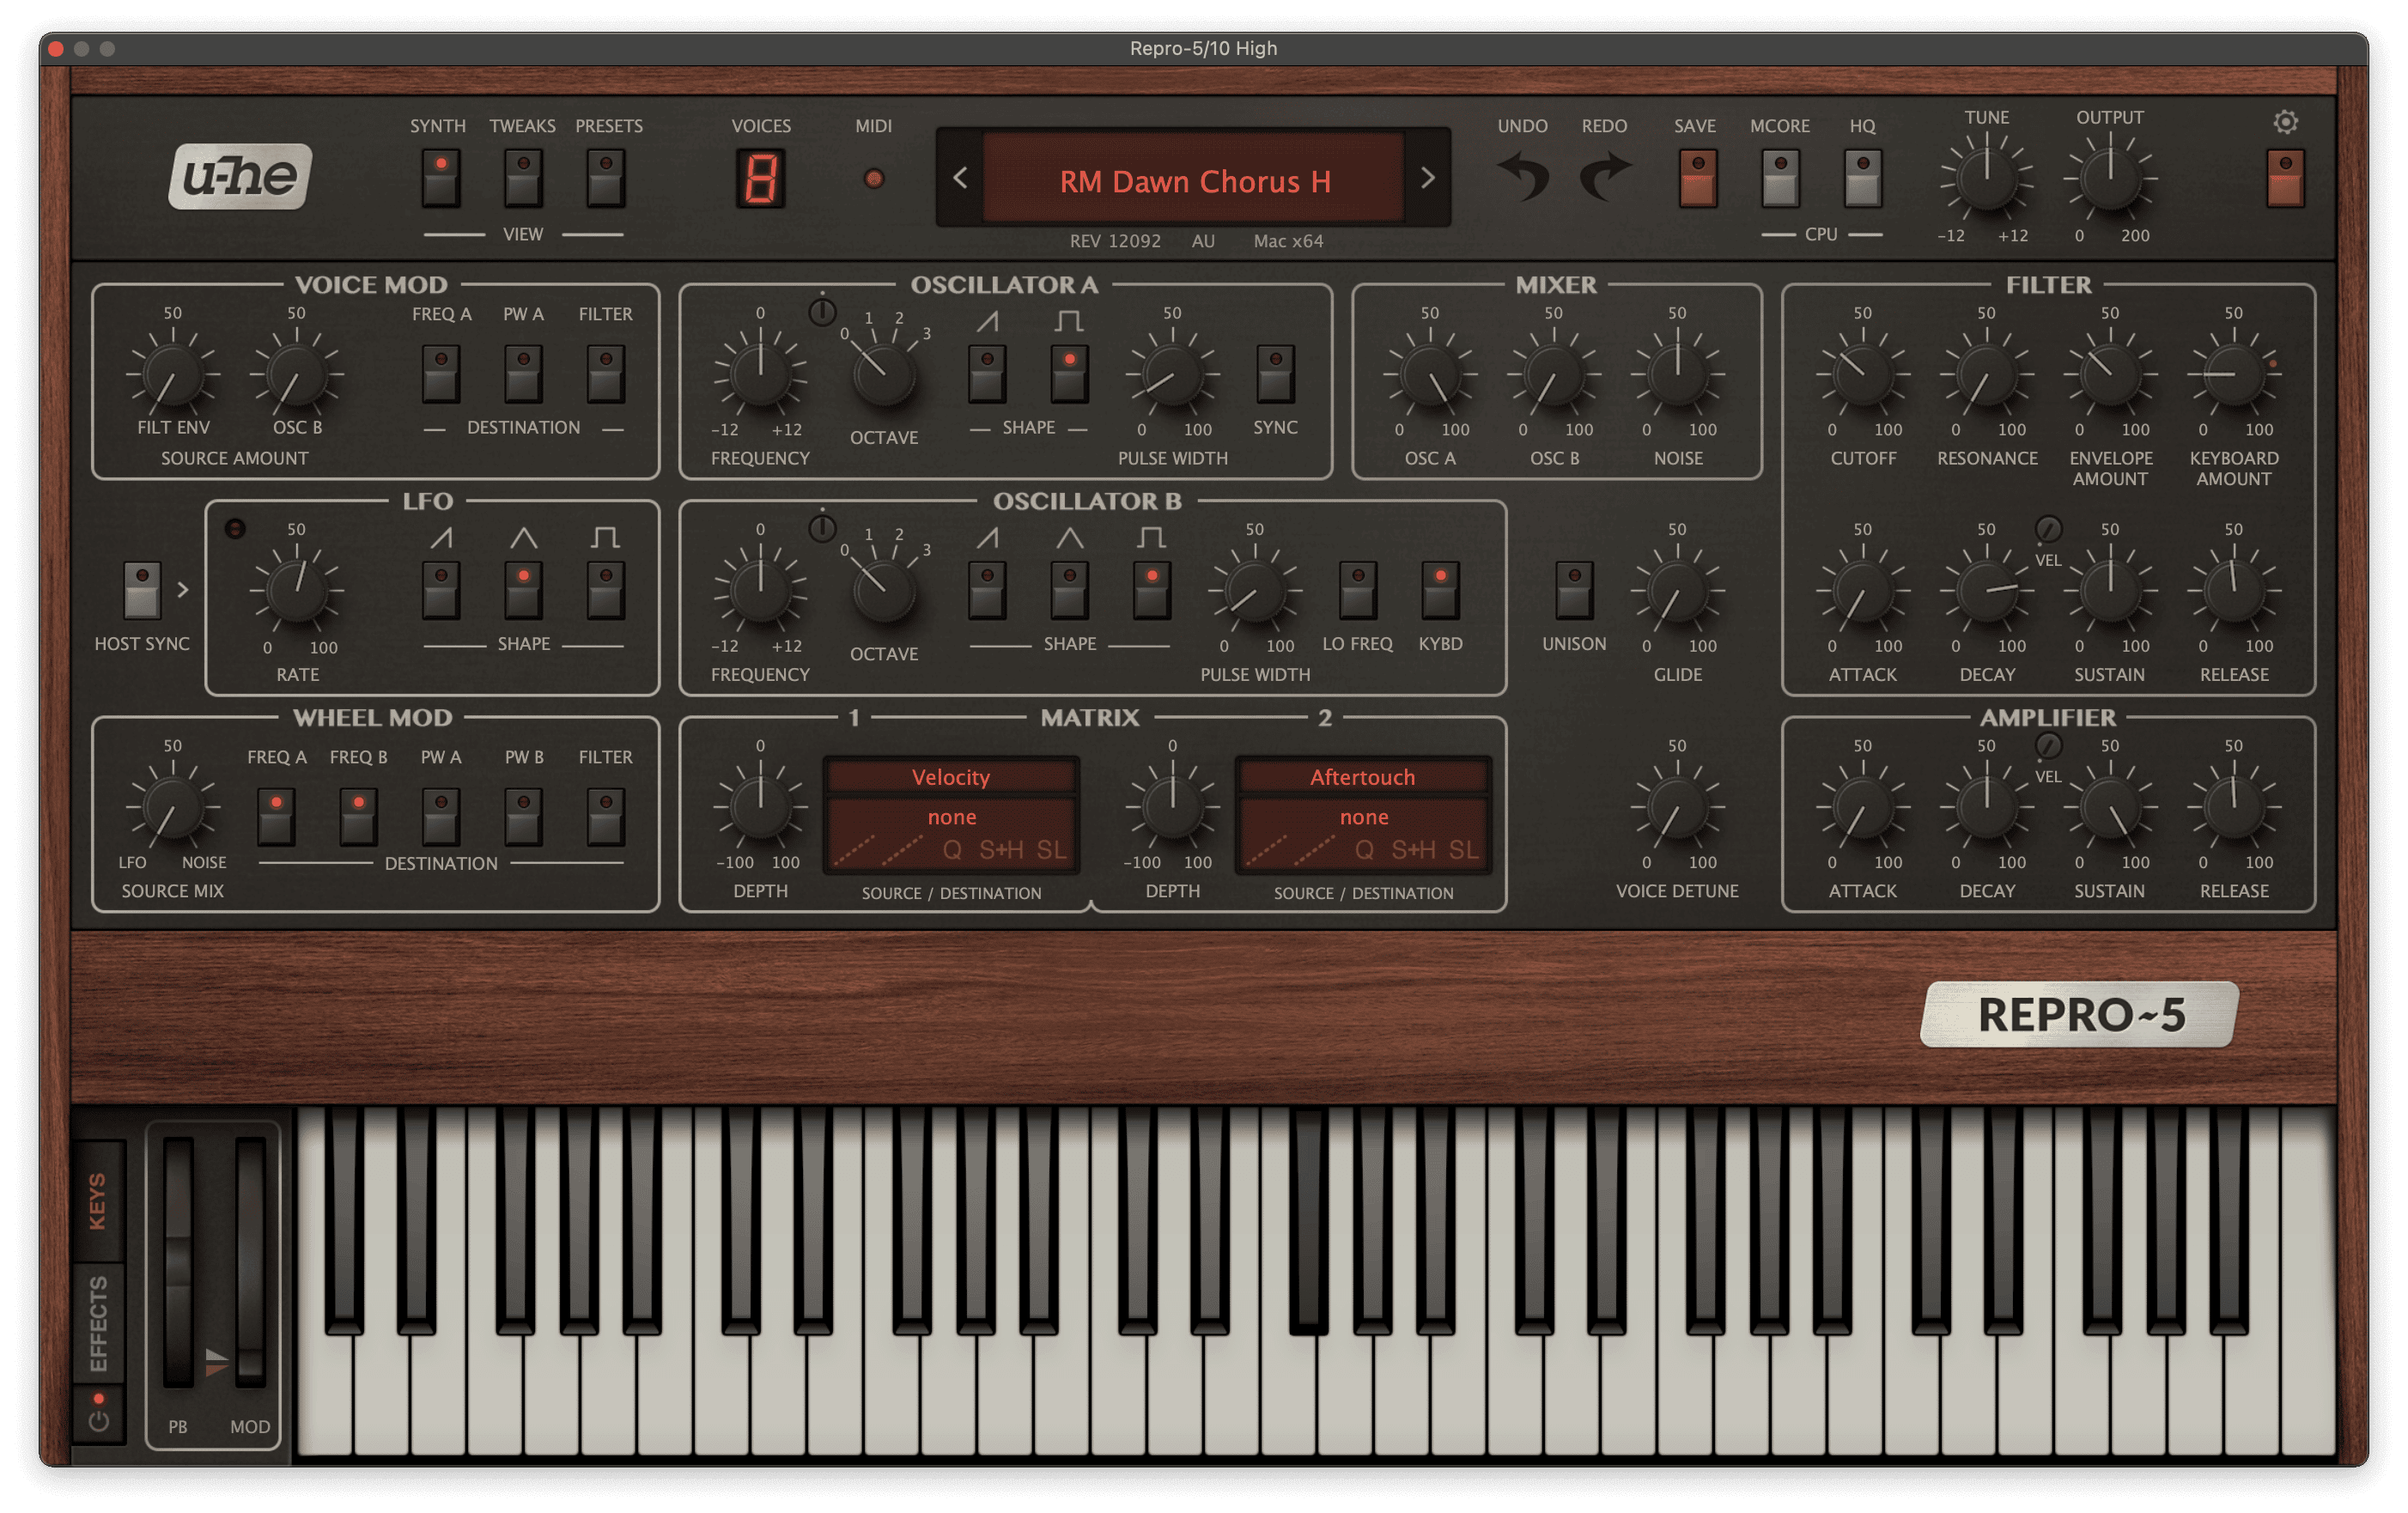
To create the basic synth patch in u-he Repro-5, use a single square wave with the pulse-width set to around 10, creating a narrow pulse wave. Set both the cutoff and the envelope amount knobs to just below 11 o’clock, and set keyboard amount to 9 o’clock, which will set up a dark sounding pluck. For the envelope times, set sustain to halfway and decay time to almost 3 o’clock.
For the detuned vibrato effect, activate the Freq A and Freq B buttons in the Wheel Mod section, raise the LFO speed to just over halfway, and raise the mod wheel knob slightly (a value of 1-3) to create a subtle rising and falling of pitch. You can also add some grit by raising the noise oscillator’s volume to halfway.
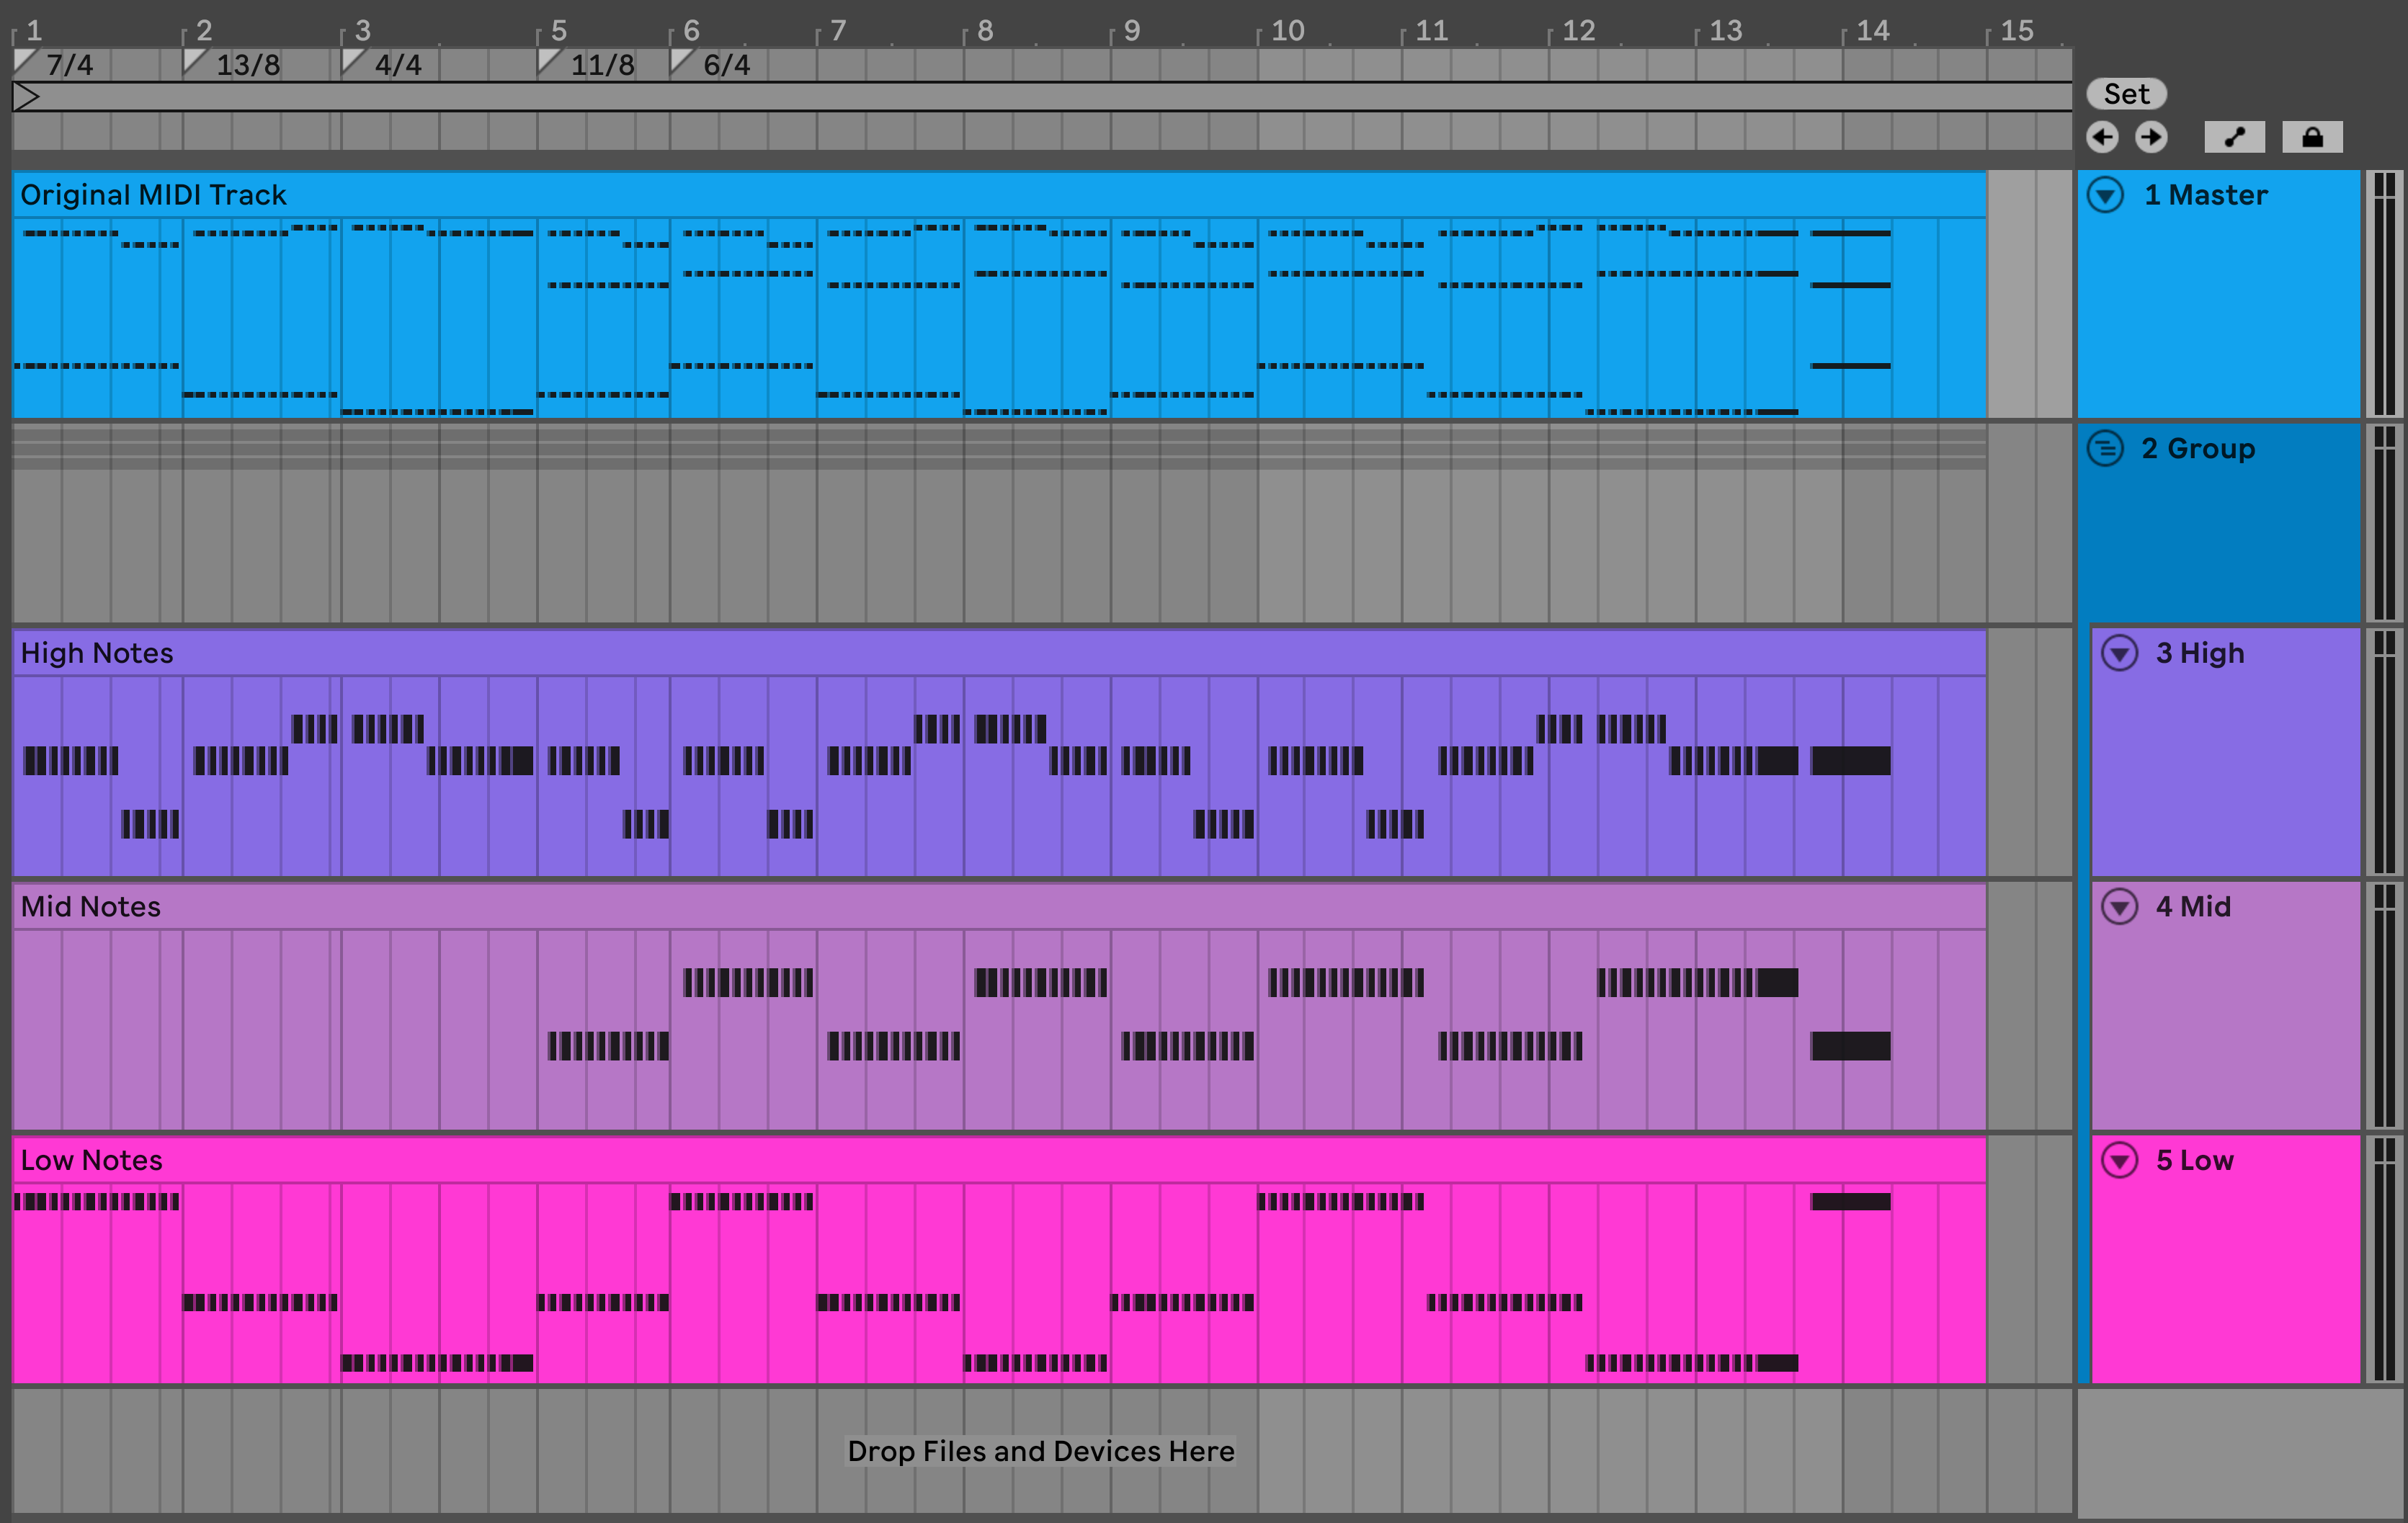
To easily split notes across multiple patches in Ableton, you can create three MIDI tracks with an instance of your synth on each track. Set each of these MIDI tracks to receive MIDI from a master MIDI track, which you can control with a MIDI keyboard. You can then get creative with Ableton’s Pitch MIDI effect, using the range and lowest parameters to select the incoming range of MIDI notes.
The three Pitch devices below are used to set the MIDI note ranges for each of the synth voices in my Dawn Chorus remake. Each device filters incoming notes so that only a specific range is passed through. The third device, for example, is set to receive only MIDI notes from E3 to A5 (24 steps), ignoring any notes above or below this range. Use one pitch device per synth track to define each voice’s range—ideally with no overlap between them.


Once you’ve set up your three MIDI tracks, you can go ahead and start tweaking each voice individually. Panning is a good place to start; in Dawn Chorus the highest voice is panned hard left, and the middle voice is panned slightly to the right. You can also make subtle changes to the filter modulation and decay time. In the download at the end of the article, you’ll find the exact settings I used for each of the three voices in the below video. Lastly, run the bass track through a saturator to drive it a little harder than the higher voices.

Last I Heard
The eerie sounding Last I Heard (…He Was Circling the Drain) is based on an unusual five-bar synth progression. The odd-numbered phrase length creates an uneven feeling to the music, something that Thom Yorke thrives on as a songwriter. This is a similar patch to the one we created for Twist, so again start with detuned sawtooth waves and create a shallow vibrato effect.
We want the filter to be less pronounced, so set the cutoff knob to halfway and the envelope amount to 9 o’clock. Set the filter envelope with attack at 10 o’clock, decay at 3 o’clock and sustain at halfway, which will create a long, subtle fade out which works nicely with sustained chords. For effects, I added some light tape saturation and medium chorus along with reverb.
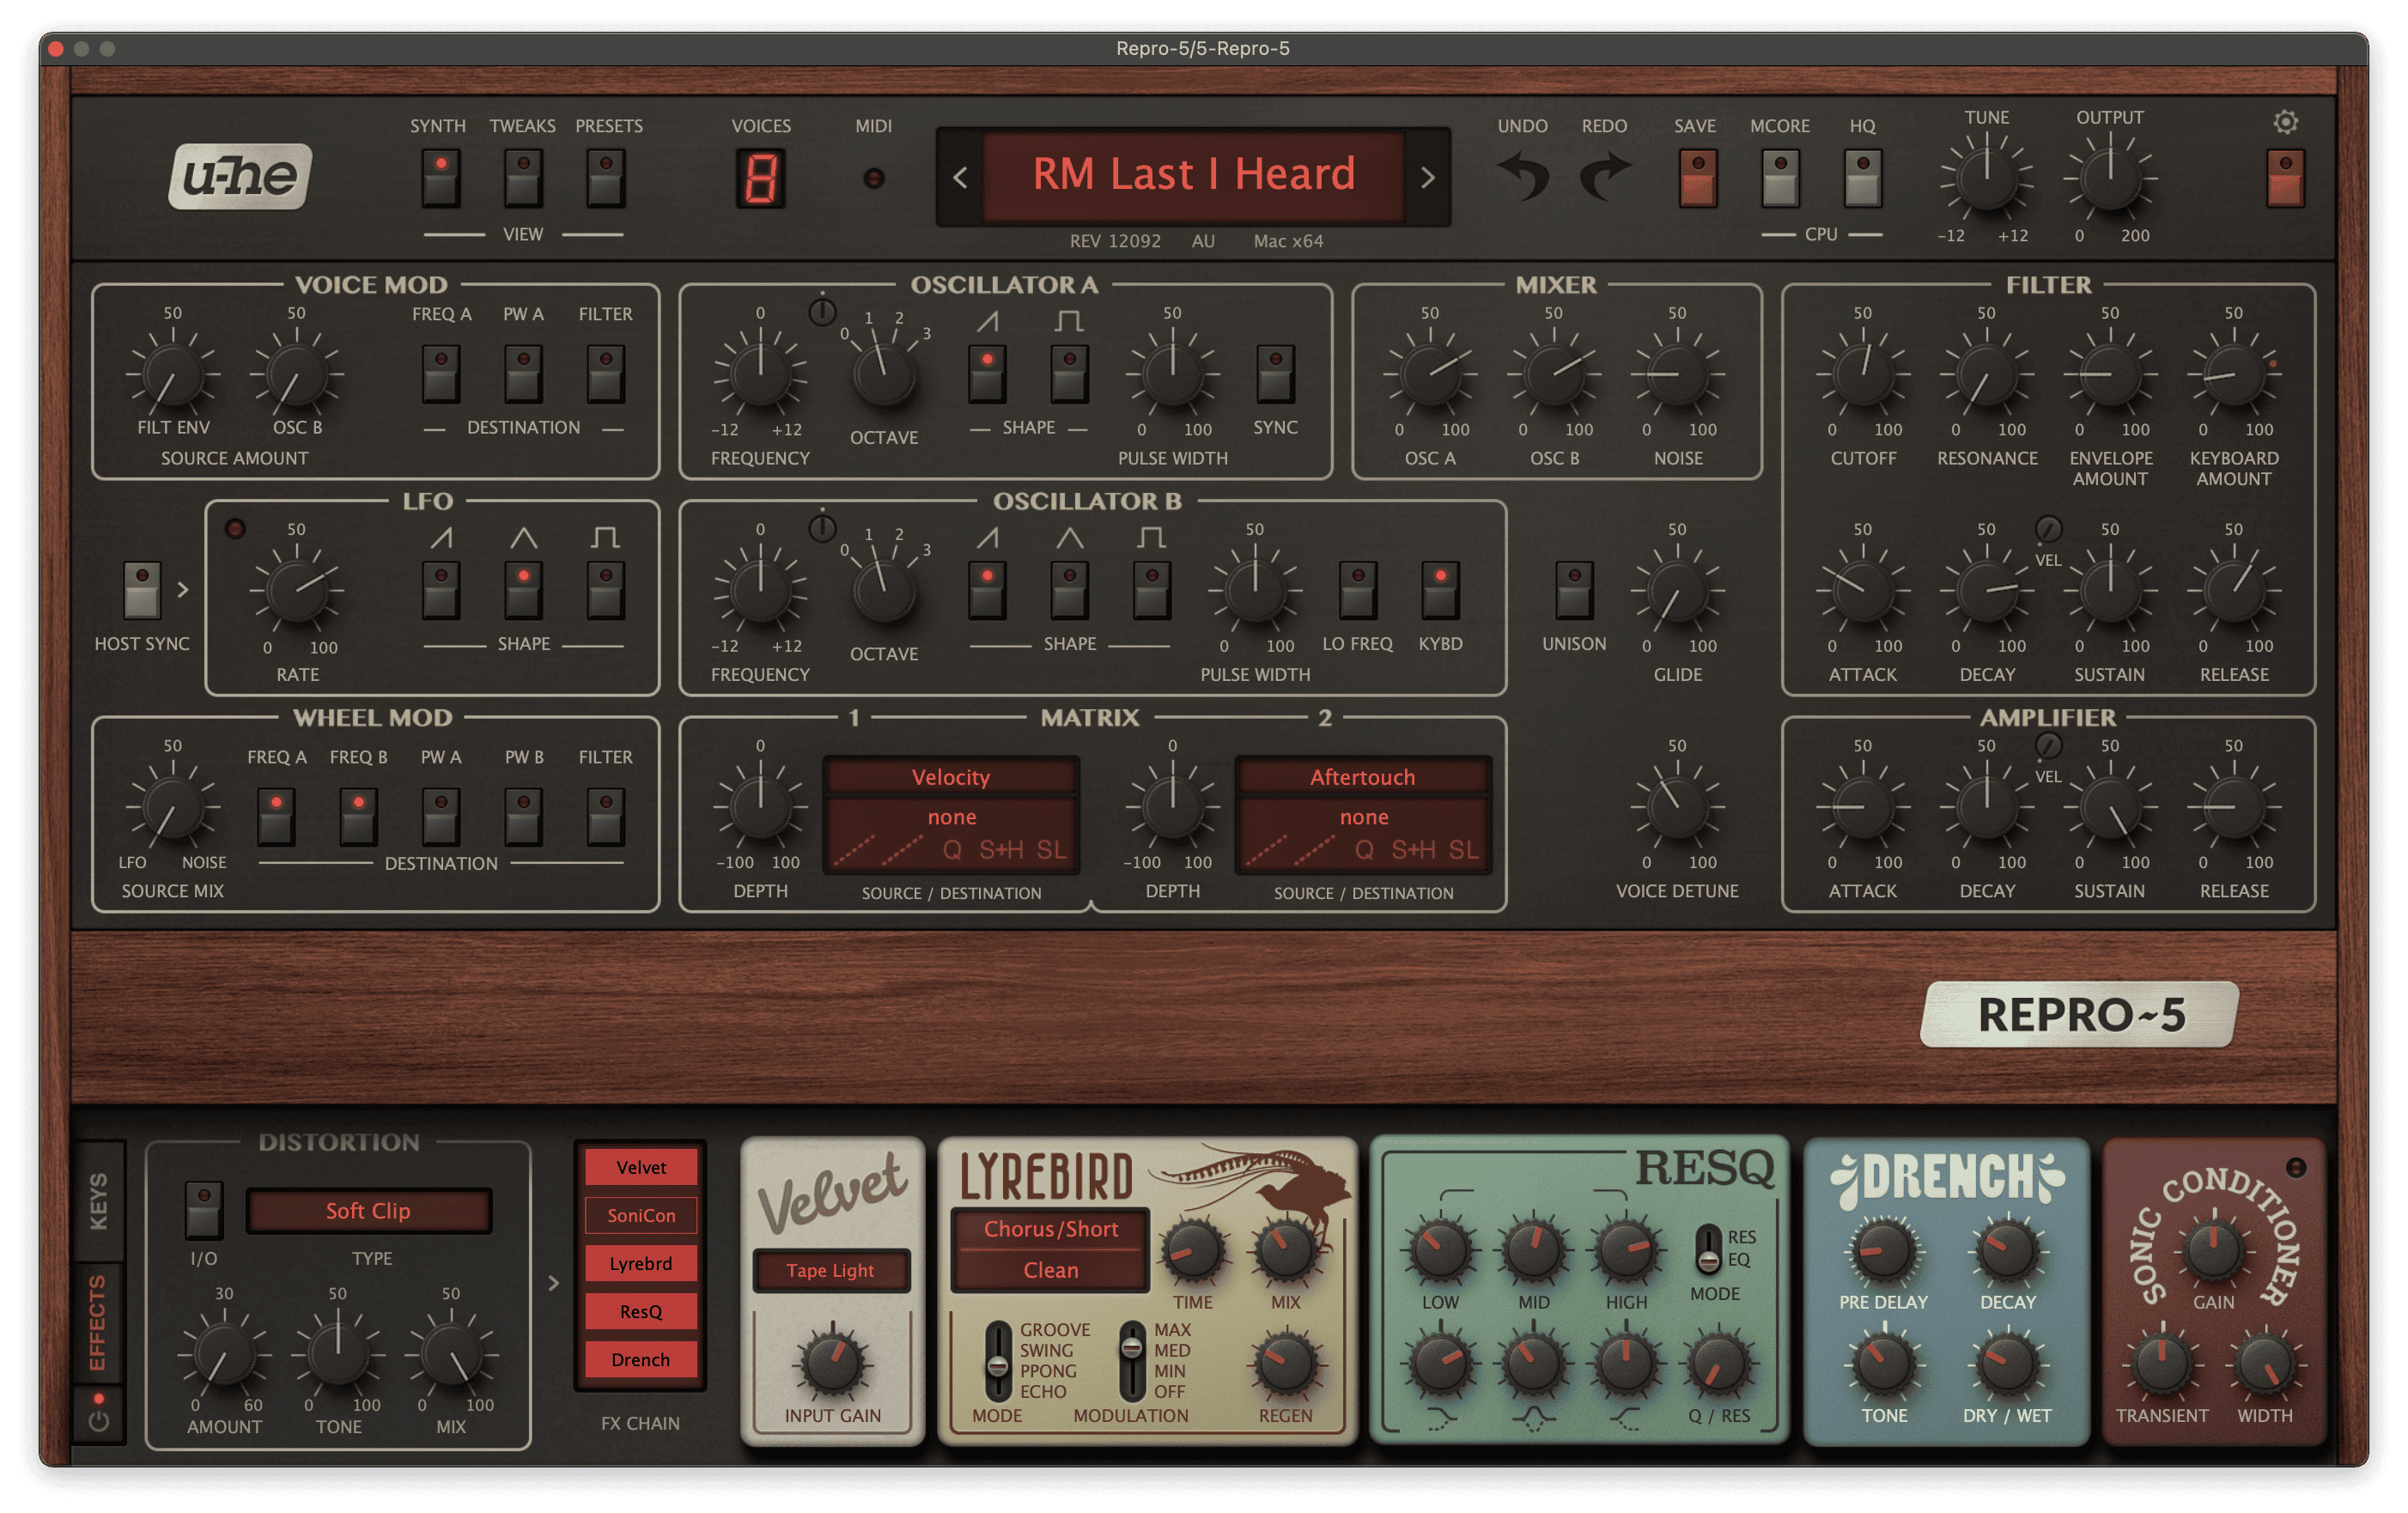
The filter opens and closes as the song progresses, which I replicated in the video by automating the filter’s cutoff point and drawing in the automation. This track was possibly recorded via the same multitrack, per-voice method that we looked at in Dawn Chorus, which would allow for more intricate filter movement, as different voices open up at slightly different rates. It would also allow the panning of individual voices, which is present in the original track, however for the video below I just used the chorus effect to create the stereo width.


this is incredible thank you! Would love to see the axe and/or atoms for peace – amok as well, the synths in those are mind bending. Happy i found your site, thanks again!
Awesome work in the Anima album, Nigel is such a genius producer. Great article thanks!!
Great article.
Definitely very useful.
Thanks!
@piotr could it be the ErbeVerb?
Great article. Any ideas on what reverbs Nigel is using/likes to use? Or a good VST reverb to emulate them? Instead of all the trendy retro verbs/delays, the reverbs sound very modern/digital to me.
I believe there’s an interview where Thom mentions a reverb unit that he liked so much that he put it on everything he recorded, to the point where he thought it was getting ridiculous – the unit was not named, but my guess is on the Make Noise reverb module, whatever it is called, which is included in the Shared System.
I am trying to make a version of the dawn chorus patch on my DSI pro2 but I can’t seem to get it right ????
Nice article and patches!
thanks!